The barbell front squat is an excellent movement for students to learn and develop. Whether for athletic development or general fitness, the barbell front squat is one of the most effective exercises for developing muscular strength. But we must prioritize proper barbell front squat form when teaching and incorporating this movement into workouts. This article will explore technique and movement tips for great barbell front squat form.
Benefits of Barbell Front Squat
One of the most common loaded variations of our standard air squat – the front squat is widely regarded as the most “athletic” of the weighted squat variation movements.
While we believe that any and all squatting has great benefit to performance, the front squat is indeed a great lift which comes with a host of benefits beyond basic below parallel strength. The front squat really hits a lot of different muscle groups! Due to the “front rack” positioning of the barbell, a vertical torso is not just helpful but required. This means that hip and ankle (lower body) mobility become an even greater part of the equation. As does midline stabilization (aka core strength). Lastly, the front rack position itself is one requiring some coordination and upper body mobility.
Not only that, but studies show squatting to increase lower body strength can produce the following benefits:
Better functional mobility and faster walking speed
Greater bone mineral density and less chance of breaking a bone
Stronger core musculature to prevent lower back pain and injury
Better athletic performance on the court or field
Faster running speed at short and long distances
Greater vertical jump height
Barbell Front Squat Form Starts With An Air Squat
If barbell front squat form is our top priority, then we must consider the foundational elements of the movement pattern. A common fault in middle and high school strength training is jumping right to the barbell. Instead, high school strength and conditioning curriculum should start with bodyweight movement patterns.
The 4 universal points of performance for any squat movement pattern are:
Entire foot in contact with the ground
Lumbar curve maintained
Knees tracking toes
Hips descending below parallel (hip joint below the knee joint)
After students have mastered proper air squat form, a popular next step is to begin loading the movement via a goblet squat. This can be a great next step to introducing resistance and preparing students for barbell front squat form.
Barbell Front Squat Form Points of Performance
When performing a loaded front squat, there are a few main coaching points to keep in mind for great barbell front squat form:
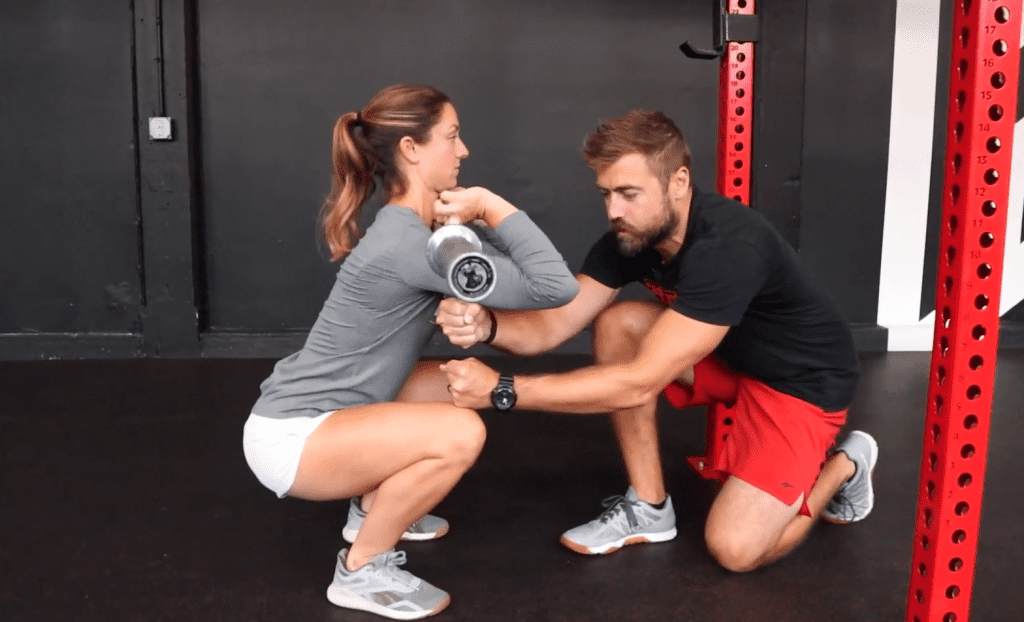
1. Hand placement – the front rack is a difficult position for many individuals to get into. Instruct them to take a wider than shoulder width and loose finger grip. The bar should rest on the meat of the shoulder, not the collarbone.
2. Elbow Height – this is the most common issue for new individuals. We want to keep the upper arm as close to parallel to the floor as possible aka high elbow position. Use visual, auditory or tactile cues to get them to keep the chest proud and elbows high (the “2 Potato Rule”). One great cue is to tell individuals to lead from the elbows on the way out of the bottom of their squat, cueing them to drive the elbows up.
3. As always, we recommend that individuals master the basic squat first before attempting any loaded variations. Even more important, though, is to maintain our 4 points of squat performance during every loaded rep. We never add weight or heavier loads to an improper movement!
Free E-Book: Essential Guide to Teaching Weight Training
Our five essential steps to initiate or improve your weight training program. Filled with extra resources, videos, and real-life examples, don’t miss this free resource!
Common Mistakes of Barbell Front Squat Form
Barbell front squat form might not come naturally to many individuals! In fact, the barbell front squat is a challenging squat variation that will often result in common mistakes and proper form failure.
First we must be mindful of many of the common mistakes that can come with any loaded barbell squat movement:
Foot movement – rotation, heels up, etc.
Knee cave
Rounded back or non-neutral spine
Complete lack of depth
We often assume the faults come from a combination of weak lower body strength and heavier weights. If that is the case, we should always decrease the weight and focus on proper barbell front squat form.
But more often than not, mobility issues are the more pressing issue with barbell front squat form. We should be mindful of shoulder mobility, ankle flexibility, and other common mobility issues that might be impacting barbell front squat form.
Below are two helpful videos that address shoulder mobility and ankle flexibility. Both these exercises are a great addition to help improve barbell front squat form.
Movement Instruction:
Loop a band around a pull up bar or upper part of a rig. Slip your wrist through the opposite end and grab both sides of the band. It is imperative that we position the shoulder into external rotation, so turn the palm up, using the off hand to assist if needed. Step back, placing the arm into full extension as your chest angles toward the floor and your hips drive back. Once in position with the arm in full extension, palm up, chest angle to the floor, we can begin to explore the position. For example, move the leg of the same target arm back and behind the opposite leg to increase the stretch.
Area of Focus:
This is a Global Mobilization meaning we are targeting numerous muscles that feed into the shoulder. However, you will likely feel the most stretch in your Lats
Importance:
One important mobilization principle to remember is that to improve a given position, like the bottom of the squat or arms overhead, we have to mobilize in that position. The Banded Distraction is a great way to mobilize our overhead position because it places the shoulder into full extension, and allows us to hang out and explore while in position. This can help improve barbell front squat form!
Movement Instruction:
Starting from hands and knees, we are going to step our right foot inside our right hand. From here, we are going to slowly lean forward, extending our knee out past our big toe. As you move your knee forward, it is important that we keep our entire foot in contact with the ground. If you can, move your chest on top of the forward leg. This helps apply more force into the stretch.
Areas of Focus:
The Low Dragon is an Ankle target stretching the Calf and Achilles, while working to improve the ankle’s dorsiflexion.
Importance:
The Ankle moves via Dorsiflexion (toes toward shin), Plantar flexion (toes away from shin), Inversion (to the inside) and eversion (outside). Limitations in ankle mobility, specifically dorsiflexion, can cause numerous functional and athletic limitations. For example, poor ankle flexion can restrict your ability to lunge, compromise landing and jumping mechanics, and restrict squat depth. It can also lead to Valgus Knee Collapse during the squat, a precursor to many ACL injuries. Improving the range of motion in our ankle joint will have a tremendously positive impact up through the kinetic chain, allowing us to perform daily movements with efficacy and safety. This can help improve barbell front squat form!
Ready to Learn More?
Schedule a free 10 minute consultation to see how the PLT4M system can help save you time, and empower student learning!
Key Takeaways on Barbell Front Squat Form
When thinking about barbell front squat form, what we must pay attention to goes well beyond the squat movement pattern itself. How to set up for the lift properly, how to navigate the rack, how to prepare for and execute a failed lift, and so on. These elements may not seem hugely important, especially at the beginning when using little to no weight, but they will be SUPREMELY important down the road.
Happy squatting!
FAQ
What About Cross Arm Grip?
Often when teachers, coaches, and personal trainers see individuals struggle with barbell front squat form and the front rack position, they consider the alternative cross arm grip. Here instead of the regular starting position and front rack position, individuals create a shelf and cross arms over each other to secure the barbell.
While this is a good alternative for someone dealing with wrist pain or injury, it avoids an important movement pattern that translates to other exercises like variations of the clean. Although it might take some time individuals can achieve the correct form of high elbow position.
Does PLT4M have other form videos?
Yes, check out our host of other proper form videos including:
Does PLT4M have other videos to address front rack position?
Yes, PLT4M has an entire library of instructional videos. PLT4M has everything from full instructional videos to quick tip and trick videos. Below is a sample from our front rack drill video. While this video is intended to help find the front rack during a clean, it also has plenty of benefits to find correct form during a barbell front squat.
To begin, we rack a weighted barbell (so it doesn’t move within the J-Hooks while we work) at roughly chest height.
Athletes will approach the bar and grasp it in a double overhand grip, just outside the framework of our body (thumb-swiping distance!), aka our clean grip, with elbows high and outside. You can just think about establishing the “top” of our final clean pull.
From here, we instruct the athletes to step aggressively into the “catch” position by firing the elbows forward.
What we want to instruct our athletes to do is release the common “death grip” on the bar and let it roll back on to the natural shelf we create with our shoulders via high elbows.
This means we hold the bar with a loose finger-tip grip, our elbows are pointing straight forward, and the load is being supported by the “shelf” created by our delts, or shoulder muscles, not the wrist joint itself.
This will simultaneously guarantee that the weight is properly positioned over the midline and create the necessary distance between the elbows and knees as we descend towards a full-depth squat.